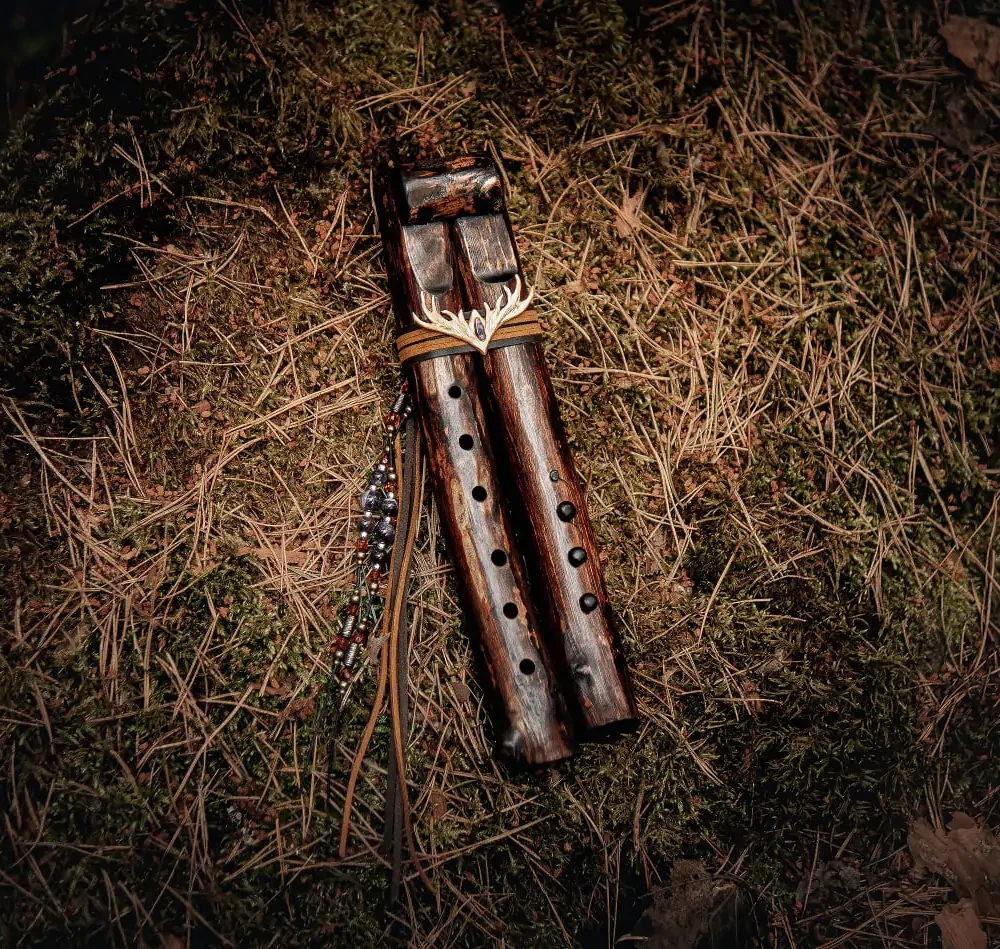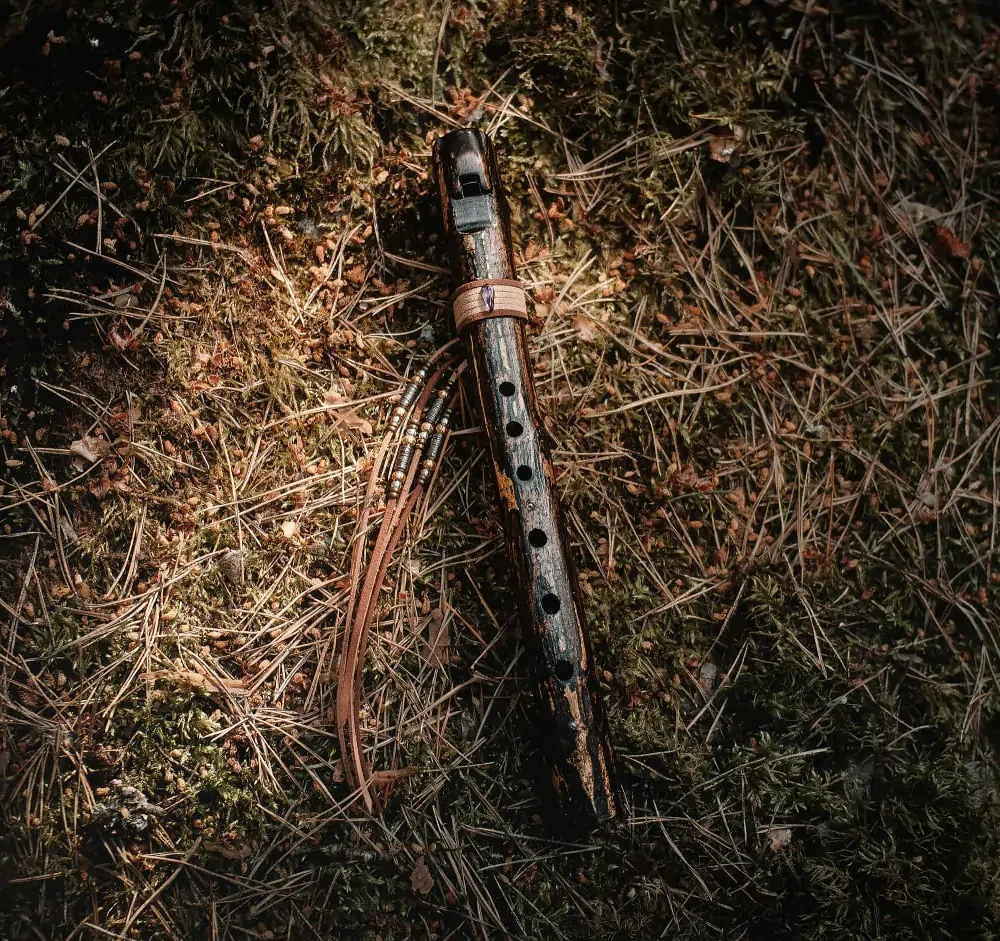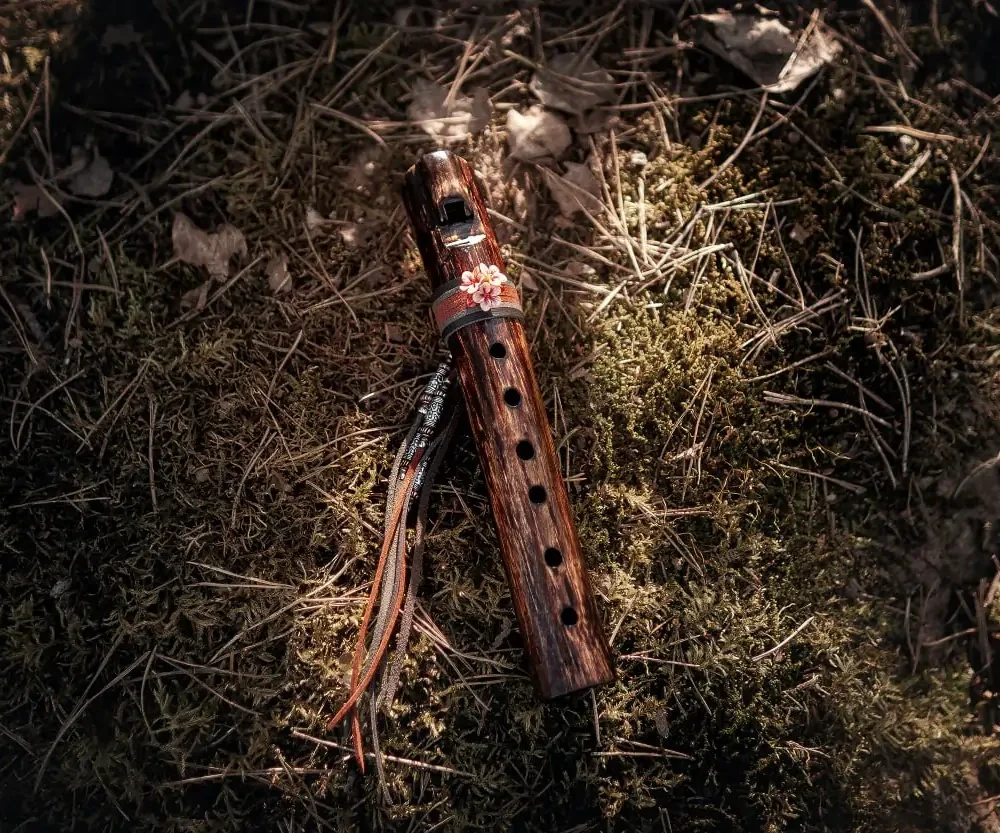
This article provides a simple step-by-step guide for beginners learning to play the Native American flute, forest flute, or ocarina. It covers basic techniques of sound production to help you familiarize yourself with the instrument at a foundational level.
First Steps: Sound Production Basics
1. Posture and Relaxation
- Sit comfortably and relax your body.
- Keep your fingers loose—avoid tension.
2. Preparing the Flute
- Cover the sound hole (in front of the block) with your finger.
- Blow briefly and sharply into the mouthpiece to clear dust and warm the instrument.
3. Holding the Flute
- Place the mouthpiece against your lips.
- Hold the flute horizontally or with a slight downward tilt—avoid near-vertical positions.
Also, do not grasp the mouthpiece too deeply, so as not to drool. It is necessary to put it to your mouth, and then tightly, but not deeply, grasp it with your lips. The grip should be airtight so that the flow of blown air does not scatter to the sides, creating noise, but falls precisely into the blowing hole of the mouthpiece. At the same time, also make sure not to accidentally block the blowing hole.
From this position, if the flute has 6 holes, place the fingers of your right hand on the three lower holes (further away from you), and the fingers of your left hand on the three upper holes (closer to you).
Additionally, stabilize the position of the flute with your thumbs on the back side. When playing, rest the flute on your thumbs and you can also additionally stabilize its position with the little finger of your right hand if many playing holes are open.
The mouthpiece rests against the lips, so it also creates an additional support point for stabilizing the flute.
If the flute has 7 holes, additionally press the 7th hole, located on the back surface of the flute, with the thumb of your left hand.
If the flute has 5 holes, the fingers of your right hand cover the three lower holes, and the fingers of your left hand cover the remaining two upper holes.
If you are left-handed, then swap the position of your hands.
However, it is worth considering that large flutes with anatomical diagonal offset of the playing holes are not suitable for both right-handed and left-handed people, since if the flute is not made to order or if nothing else is specified when ordering, the diagonal offset is done by default for right-handed people.
If it is a wooden ocarina, then the fingers of the right hand are intuitively located on the right row of holes, and the fingers of the left hand are on the left.
4. Producing Sound
- Close all holes firmly and airtight, then breathe gently and smoothly into the mouthpiece (do not blow hard).
- Avoid excessive pressure: It may force the flute into a higher octave or create whistling.
- Adjust air pressure:
Each flute requires its own approach and its own level of air pressure, some flutes are played with very light breathing, others – with strong breathing.
As a rule, the larger and lower the flute, the weaker the breathing should be, and vice versa, the smaller and higher the flute – the stronger the air supply should be.
Start with minimal pressure, then gradually increase to find the “golden mean” (clear, stable tone).
5. Troubleshooting Unclear Sound
• Advice only for Native American flutes with a sliding block. Adjust the block above the sound hole – it may have shifted.
The block should be close to the rectangular sound hole, but not cover it. Try moving it forward or backward a little and check how the sound changes. Also, make sure that the block is tightly tied and does not move.
• Make sure that your fingers are tightly covering all the holes. If any of the holes are not completely covered and air leaks out through them, the flute will make an unpleasant whistling and grinding sound, the sound will not be clear and stable.
• For ocarinas and forest flutes: experiment with the direction of the air flow into the mouthpiece hole. If you are holding a forest flute or ocarina for the first time, it might be that you will not be immediately able to find the right position for a clear, clean sound, here you just need to play a little with different options for air flow angle and the density of your lips on the block and the end of the flute.
The air should be supplied not parallel to the air duct, but slightly from above, at an angle, tightly grasping the edges of the mouthpiece hole with your lips so that the air enters the air duct clearly.
If the exercise is difficult with all holes closed, start learning to extract the first sound with all holes open.
With all holes open, stronger pressure is required when supplying air, which is easier for beginners, and this method also eliminates possible problems due to loose pressing of the playing holes with fingers, therefore, it will make the task of the first sound extraction easier.
After you manage to extract a confident sound with all holes open, return to the exercise with extracting a sound with all holes closed, reducing the pressure when supplying air.
Minor Pentatonic Scale
This chapter is mainly dedicated to pentatonic flutes that are tuned into minor pentatonic scale. If your flute has other scale, please read this guide, but refer to the fingerchart of your flute.
Play the scale. As soon as you can get the first confident sound with all the holes closed, you can start playing the scale. Open the holes from the bottom up one by one.
If the flute has 6 or 7 holes and is tuned in a minor pentatonic scale Mode 4/6, keep the 4th hole closed all the time (the holes are counted from the bottom). It is covered by the ring finger of the left hand, if the left hand is located on top: just keep this finger on the 4th hole all the time, without taking it away. This note is not included in the main pentatonic scale, so it is better to postpone learning it until later, when the basic pentatonic scale is confidently mastered, and the first improvisations are obtained.
Each flute is unique. Each flute is special not only in terms of sound and character, but also in terms of its shape, location and size of the playing holes.
Therefore, before learning to play the scale, give yourself time to get used to the instrument – hold it in your hands with all the holes closed until this position of your hands becomes comfortable.
Then, silently, without breathing air into the flute, try to slowly open the holes one by one, according to the fingering, up and down.
And only when your fingers get used to it and begin to feel comfortable, you can begin to supply air and slowly play the scale up, then down.
Do not rush, do all the exercises at the slowest speed first, this way you will better feel the instrument and better understand the technique of sound extraction.
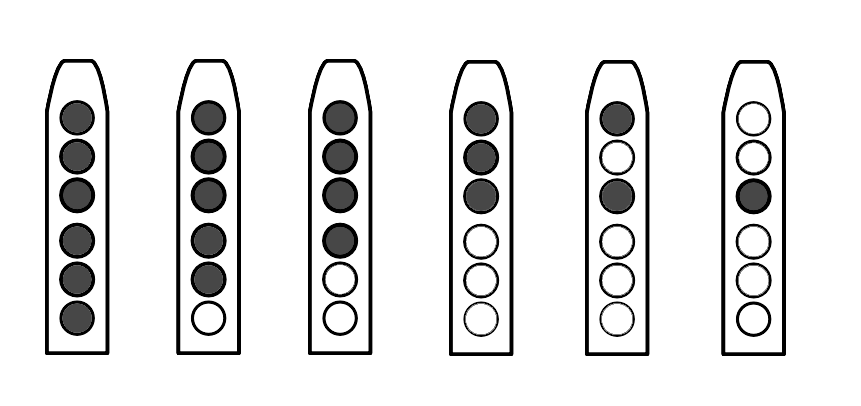
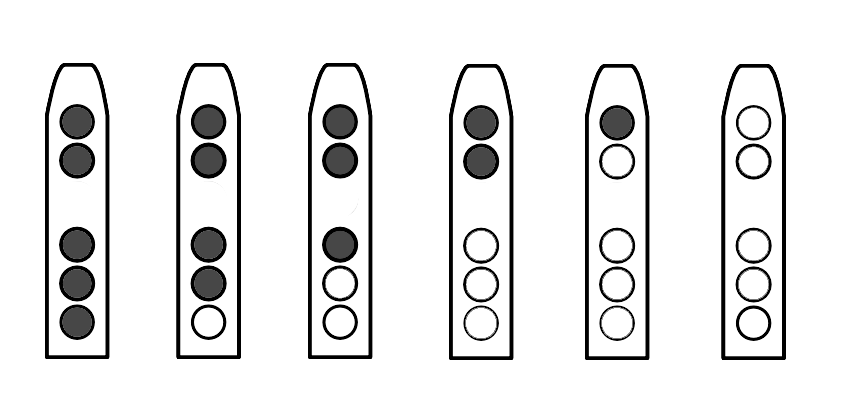
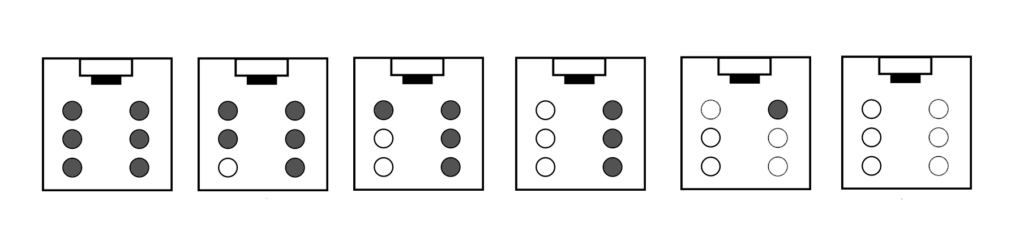
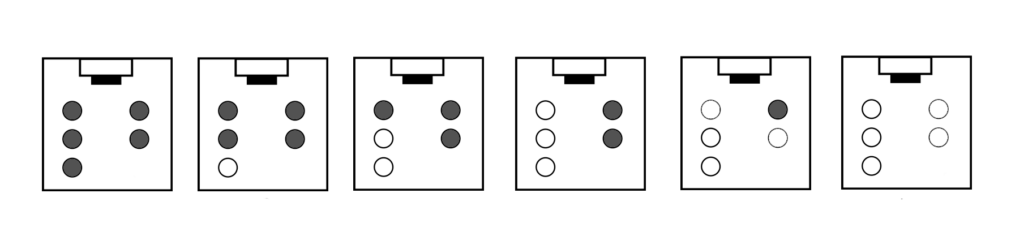
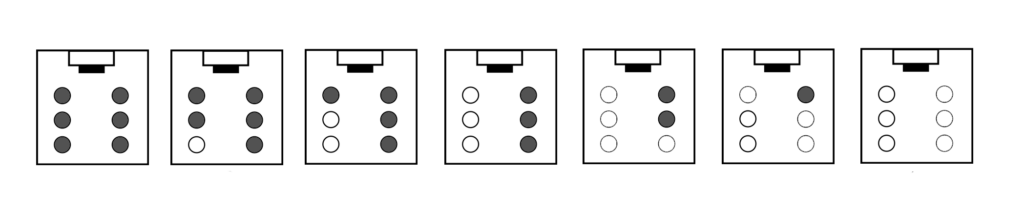
Below you can see the fingering of the basic minor pentatonic scale.
• The top of the diagram is the mouthpiece, the bottom is the bottom end of the flute.
• The holes are counted from the bottom up (the hole furthest from us when we hold the flute in the playing position is the lowest on the fingering chart – it is also the first; and the closest to us is the highest on the fingering chart – it is also the sixth on a 6-hole flute.
• Black circles represent closed holes, white circles represent opened holes.
Basic minor pentatonic scale on a 6-hole flute
Basic minor pentatonic scale on a 5-hole flute
Basic minor pentatonic scale on a 6-hole ocarina
Basic minor pentatonic scale on a 5-hole ocarina
Breath control. Lower notes require less air pressure, higher notes require more air pressure. Practice playing the scale up and down, adjusting the pressure – increasing the breath as you open each hole up, and decreasing it as you close each hole down. So the highest note on the flute will require the strongest breath, and the lowest the weakest.
The two lowest notes on flutes are usually the most sensitive (all holes closed; and all holes closed except the bottom), and they require special breath control – if you apply too much air, they can easily break into the upper register.
Do not move on to the next stages of training until you can confidently play the basic pentatonic scale up and down.
Improvise. Combine the notes of the basic pentatonic scale and experiment with different variations of simple melodies. Do not be afraid to make mistakes – in the minor pentatonic scale, almost any combination of notes sounds harmonious.
Adding Expressiveness
Accents “tu”. Whisper “tu” lightly and silently at the beginning of each note. This will accentuate the notes, make them separate, not merged, and will add rhythm to improvisations and melodies.
If you pronounce the silent “tu” with more pressure and sharpness, you can also decorate the notes with additional overtone whistles.
Dynamics of sound. Try to add expressiveness to your melodies by varying the volume of the extracted notes (more pressure of breath – louder note, less pressure of breath – quieter note).
Vibrato. Create an oscillation of the air flow when supplying air to the mouthpiece to create a vibrato effect. This will liven up the melodic lines.
The essence of the technique is to deliver breath into the flute not with a uniform force (like calm on the water), but with a wave-like intensity, smoothly alternating strong and weak breathing (like light waves on the surface of the water). This oscillation of the air flow is created not with the mouth, but with the diaphragm, stomach, chest.
Try doing a simple exercise:
1. Take a thin sheet of paper, place it at a distance of approximately 5-10 cm from your face.
2. Start to blow air onto the paper sheet smoothly and slowly. You will see how its lower end has shifted and remains in this position unchanged while you blow. The sheet should hardly oscillate if you blow smoothly and with the same intensity.
3. Add a smooth, slow wave-like quality to your breathing: now smoothly increase your breathing, now smoothly decrease it. The exhalations should not be sharp, so that the paper sheet flies off abruptly, but light and smooth – to create a smooth oscillation of the paper back and forth, like a swing.
4. Start with slow oscillations, gradually increasing the speed of alternating strong and weak breathing, so that the speed of oscillation of the paper sheet also increases. At the same time, continue to monitor the smoothness of these oscillations.
As soon as the exercise with the paper begins to work, you can transfer the technique to the flute. Take any note first with smooth, even breathing, and then, just like with the paper sheet, begin to create air oscillations – smoothly increasing your breathing, then smoothly decreasing it. Start with slow oscillations, gradually increasing the speed as soon as you begin to feel confident.
Legato. A musical technique that consists of creating a very smooth transition between notes. To do this, you do not just open or close the hole to extract the next note, but do it as softly and slowly as possible, smoothly covering or opening the hole with your finger, like a blanket.
Staccato. Another musical technique that is the opposite of legato – a sharp and abrupt extraction of notes, separating each note with a short pause. A technique for articulatory performance of lively rhythmic motifs. Here, the skill of using the accent “tu” will come in handy.
Completing musical phrases. Each melody and improvisation consists of phrases – separate short musical fragments from which music is built, like text from sentences. Experiment with different options for completing phrases – it can be a smoothly fading note, or a smoothly fading note with vibrato, or an abruptly completed note without fading. Another popular technique is the abrupt completion of a fading note with a break to the upper notes (for this, at the end of the fading note, it is necessary to sharply increase the pressure of the breath, then quickly simultaneously open several playing holes above the sounding note, cutting off the air supply immediately after that).
Double and multi-channel flutes and ocarinas: Play two (or more, depending on the number of sound channels) mouthpieces simultaneously to create harmonies, or separately for solo melodic lines.
Extended Minor Pentatonic Scale
This chapter relates to 6-hole and 7-hole pentatonic flutes.
Master the 4th hole. Add this note as a “spice” to the melodies.
If you have reached this point, then you should already be able to play your first improvisations. If not, do not rush – mastery comes with practice. When you finally feel that you are confident in playing in the minor pentatonic scale, you can move on to this stage.
The additional 4th hole was mentioned above, now it is time to master it. This note can be used to add new shades to your playing – like spices in food that make it tastier. But, like any spices, it must be used consciously, because it will not be appropriate in every melody.
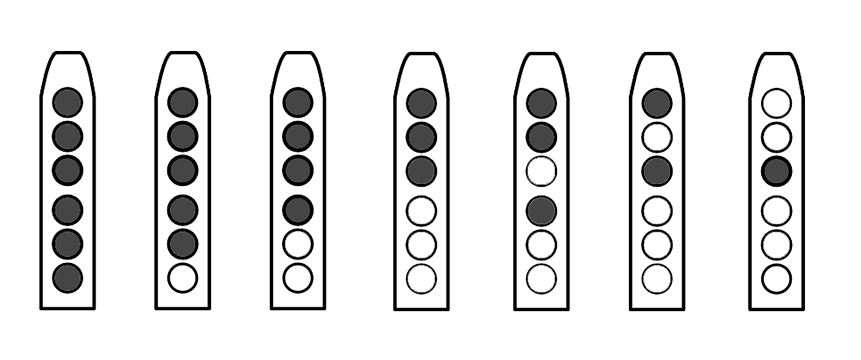
Below are the fingerings of the extended scale, including this additional note. You must first play the scale from the bottom up and back several times so that your fingers get used to it.
Then start experimenting: play the basic pentatonic scale, adding this new note from time to time, and listen to how it sounds. Take your time, do the exercise patiently and attentively until you find combinations that you like.
Continue experimenting every time you play the flute, so that your ear and muscle memory remember successful combinations.
Extended scale on a 6-hole flute
Extended scale on a 6-hole ocarina
Chromatic scale
Definition. Once you have mastered the basic and extended pentatonic scale, you can move on to learning the chromatic scale. It will allow you to gain even greater freedom not only in improvisation, but also in selecting and learning your favorite melodies of popular compositions, as well as mastering many other scales for improvisation in addition to the pentatonic scale. It is recommended to move on to this stage only after confidently mastering the basic and extended minor pentatonic scale or another basic scale of your instrument.
The chromatic scale is a scale consisting of semitones. In this scale, the distance between adjacent notes is a semitone.
Chromatic tuning. In order to comfortably play the chromatic scale on the flute, the appropriate additional tuning must be made during the manufacturing process so that additional semitones can be extracted using cross fingerings.
If there is no additional tuning on the instrument, it is still possible to play a chromatic scale on most flutes, but, in most cases, with the additional use of the half-covering technique of the playing holes.
Half-covering. Half-covering the playing holes is a sound production technique in which the playing hole is not completely closed, but half-covered. Thus, if the interval between two notes of the basic scale is one tone, a half-covered hole will allow you to produce a semitone between these notes.
Example: X is a closed hole, 0 is an open hole, H is a half-covered hole, the mouthpiece is on the left.
The fingering xxx xx0 allows you to produce the note G, and the fingering xxx x00 – the note A. The interval between G and A is one tone. Using the half-covering of the second hole from the bottom xxx xH0 you get G Sharp (A Flat) – a note a semitone below A and a semitone above G.
Half-covering of the playing holes cannot be completely avoided even with additional chromatic tuning of the instrument – one note (a full tone higher than the base note) still has to be played in this way (half-covering the first hole with all the others closed xxx xxH), since there are no alternatives of cross-fingering for it.
Is chromatic sclae full? On flutes tuned in minor pentatonic, there is no interval of a semitone above the base note, since the interval between the base note (all closed holes xxx xxx) and the second note (the first hole open with the rest closed xxx xx0) is large – 1.5 tones.
When using the technique of half-covering the first playing hole with all the others closed (xxx xxH), the interval is 1 tone above the base note. To play an interval of 0.5 tones from the base note, it is necessary to cover the hole more than half – about ¾ of the hole, which is not feasible on many flutes, and the technique itself is quite complex, so it is almost never used.
Fingering and playing technique. The fingering of the chromatic scale is different for each flute, so to study it, refer to the file with the fingering for your flute, which is sent when you purchase a flute, or contact the seller of the instrument if the flute was purchased from another maker.
When extracting notes of the chromatic scale, it is also worth considering that sometimes the breath force for them may differ slightly up or down from the breath force when extracting notes of the base scale. In order to know exactly how much air you need to blow, it is recommended to play the scale with the tuner turned on. A good tuner for a smartphone is gStrings.
Increased breath force will slightly raise the note, and weaker breath will lower it. Please note that if your instrument is not tuned to 440 Hz, you should specify the frequency in the tuner settings.
Upper register
Single-octave. Traditionally, Native American flutes and forest flutes are single-octave wind instruments. Despite the seemingly small playing range of only one octave, it is this feature that creates a unique sound and ease of playing on these musical instruments.
Flutes with a range of 2-3 octaves are usually much more difficult to master due to the need for good breath control. These are wonderful instruments for playing complex melodies, but for soulful improvisations, meditations and sound healing, the Native American flutes and forest flutes are best suited. Due to the relative simplicity of sound production, they allow you to relax during the playing session and completely immerse yourself into music.
However, many (but not all) of these flutes can still produce a few upper register notes. Typically, these are 2-3 additional semitones, sometimes more.
Fingering and playing technique. Each flute has its own fingering for upper register notes. Typically, this is a cross fingering using half-covered holes.
Upper register notes are mainly produced using the overblowing technique.
Overblowing is a technique that involves a strong, sharply accentuated supply of air, allowing the instrument to move to upper register notes.
On ocarinas, the overblowing technique is usually not available, so playing upper register notes on them is only possible if these notes are provided in the basic scale and there are playing holes for them.
On some flutes, it is possible to play an interval of a semitone above the octave without overblowing. On 7-hole flutes, it is always possible to play a semitone and a tone above the octave without overblowing, if the 7th hole is tuned to a tone above the octave (in some cases, it is also possible to play one and a half tones above the octave without overblowing).
The fingering of upper register notes is different for each flute, so to study it, refer to the file with the fingering for your flute, which is sent when you purchase a flute, or contact the seller of the instrument if the flute was purchased from another maker.
Now you are creating your own melodies. If it is difficult yet, do not rush. The path to perfection is practice. Let music fill this world with beauty 🎶